Kandi Corp's New Encautic Hot Wax Art Supplies
 |
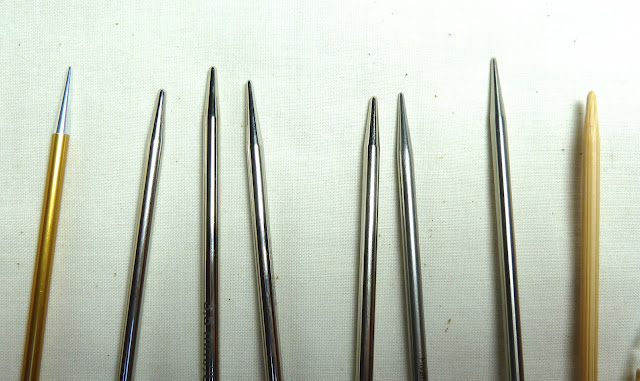
| Kandi Corp's Hot Wax Art Stylus and tips, a printed design on rice gampi paper, Kandi Corp's encaustic wax cakes, |
I have always been intrigued by encaustic art but have never tried it before the great people at Kandi Corp surprised me by sending me samples of their newest line of Encaustic Hot Wax Art supplies. I was eager to dig in and see what these encaustic wax tools were all about!
In case you are not aware of it - Kandi Corp is the company that, I think, most popularized hot fix Swarovski crystals, rhinestones and metal embellishments. They are also the company the makes the DeColourant supplies that I previously reviewed. Not only are their products kind of cool but the people who work there are genuinely good, helpful folks. If you have a look at their website you will find a variety of projects suited to the use of their array of great products.
 | ||||||
| The selection of tips included with the Stylus |
The Hot Wax Art Stylus is very versatile tool and comes complete with five unique tips. They allow you to produce a wide variety of lines and marks. You can cover a larger area with the large 'paddle' tools or achieve precise, fine line, details with the pointed tip and wire brush tips. The round tip makes an array of different sized circle depending on how much wax you use and how light your touch on the paper is
 |
| Hot Wax Art Encaustic Cakes |
When I first saw the size of the cakes I wondered just how fast they would be used up - they seemed small to me - as do the other encaustic wax cakes I've been tempted to buy in art supply catalogs. After just this little bit of playing, however, I can see that they would last quite awhile.
 | |
| Color Chart For Hot Wax Art Cakes |
 |
| Paperwork included with the Hot Wax Art Stylus. Included Stylus tips: Pen, Brush, Paddle, Edging and Ball |
 |
| Helpful lighted on/off switch on the Stylus |
The one 'color' that I would order a double of is 'clear'. The provided colors didn't include a 'clear' and so I tried to using a sheet of plain beeswax that I had on hand to dilute - or lighten- the colors. I think 'clear' would greatly enhance your palette options - as would, of course, a cake of black. The worked alright but I'm certain that the ready made wax cakes would make for a much smoother blend.
My 'method' was to simply dip the preheated Stylus (fitted with one of the tips) into the wax cake and then apply directly to my paper. The wax is very easy to remove with a paper towel before you go on to using another color. This small bit of experimentation has made me realize that this is, indeed, a technique that I would like to take further. Working directly from the cakes is quick, effective and as easy as it gets. In the future I may consider buying a used electric griddle which would allow for the waxes to become heated before they are needed...not that heating them takes a lot of time - it would just be one more avenue to consider.
 |
| A sheet of beeswax that I had on hand and used to try to dilute the colors in place of a cake of clear wax |
 | |
| The pen tip affords great control for precision work. It reminds of Tjanting needle tip used to make batiks. |
The photo below shows my very first attempt as applying wax to a a surface. The orange squiggle on the left was made with the smaller of the two 'paddles' tips held in it's side...rather like using a large calligraphy tipped pen. The pinkish shapes on the right were made using the larger 'paddle', the green dots were made using the ball tip and the orange 'brush' strokes around the green green dots were made using the wire tip.

Below: Fine line details made using the 'tjanting type', open sided, tip.

Below: I couldn't just let the lines remain simply lines on the page of course! I had to play around with combining the colors and tips. Yes, I did have a fun time exploring some of the myriad possibilities.

Below: Which way does it go?!


I decided to try using the supplies to create a 'real' painting. Knowing nothing at all about how these supplies should - or could - be used allowed me to truly play- unencumbered by any notions of what I should - or shouldn't - be doing. I printed a circular image onto a piece of silk Gampi tissue and then used the wax cakes in varying combinations of colors and Stylus tips to build a design around the circle. Diluting the colors with the beeswax gave me a nice, warm, golden tone. which I find appealing, but I think that using 'clear' cakes would yield truly desirable color variances and, most likely, would also allow for a much smoother application. That being said what I really enjoyed about using wax is the textural elements that you can build up layer upon layer with the wax. I am excited about some of the things I have in mind to try. I want to make a layered piece and I want to try embedding small leaves into the layers. There are endless interpretations of encaustic techniques I think.
 |
| The 6" X 9" page I made using Kandi Corps Hot Wax Encaustic Cakes in Carnation Pink, Orange & Spruce Green (plus some plain beeswax) and their excellent Hot Wax Art Stylus Tool |
 |
| Detail showing how the wax can be used as a texturing medium |
 | ||
| Wax textured with paddle, ball and wire brush |
For the FTC :I was supplied with these products by the manufacturer for the purpose of honest review. No other remuneration was received!
Your piece is fantastic! I love the color palette and the textures you created. I've been wondering about the hot wax uses, too. I'm so glad you got to play and show the rest of us how this product can be used!
ReplyDeleteThis looks fun and addicting! A studio neighbor works in encaustics and I hope we can play when the weather breaks.
ReplyDeleteOh no!! Something else to tempt me!!
ReplyDeleteWhat fun you had and a great piece as a result.
ReplyDeleteOh Dear God, please don't let me order one of these kits. I do not need another hobby!
ReplyDeleteBeautiful artwork, Marie! I have been wanting to try encaustics for the longest time, but kept talking myself out of it. The temptation is mounting! You get the best mail!;) Have a great weekend with your new art supplies.
ReplyDeleteOnce again, you have created something breathtaking. How do you do it?
ReplyDeleteI had been thinking of buying this stylus and found your review when doing a google searh ~ thanks for the great info and detail -- I'm now convinced :)
ReplyDeleteLOVE the textured 6X9 encaustic piece you painted and wonder what sort of paper you used? Did you put some sort of foundation surface down first or did you just start using the wax colours straight on top of the paper surface?
Many thanks!
Dallas
Hi Dallas:
ReplyDeleteI can't contact you because you're anonymous - but I just used a page of heavyweight sketchbook paper --- the design in the middle was made from very lightweight rice paper that was glued to the surface of the sketchbook paper. HTH